
Jekyll is really useful for building static websites. You can use a Jekyll theme to write posts using markdown with less amount of HTML, CSS, and have a responsive good looking website. If you are a developer who loves to create websites while having control of every single aspect of HTML and CSS, Jekyll allows for all of that. You can create your own themes, layouts, control, and configure the entire site.
We will present enough information to get you started with your first Jekyll website, from creating content to serving them on Github pages.
- Installation
- Creating a site
- Front matter
- Config.yaml
- Installing themes
- Layouts
- Includes
- Hosting on Github pages
- Wiki
Installation
The Jekyll website provides installation instructions that cover Windows, Mac, and Linux operating systems.
Creating a site
For this tutorial, we will name our website “test_blog”. Issue the command below at the terminal to create your new site.
jekyll new test_blog
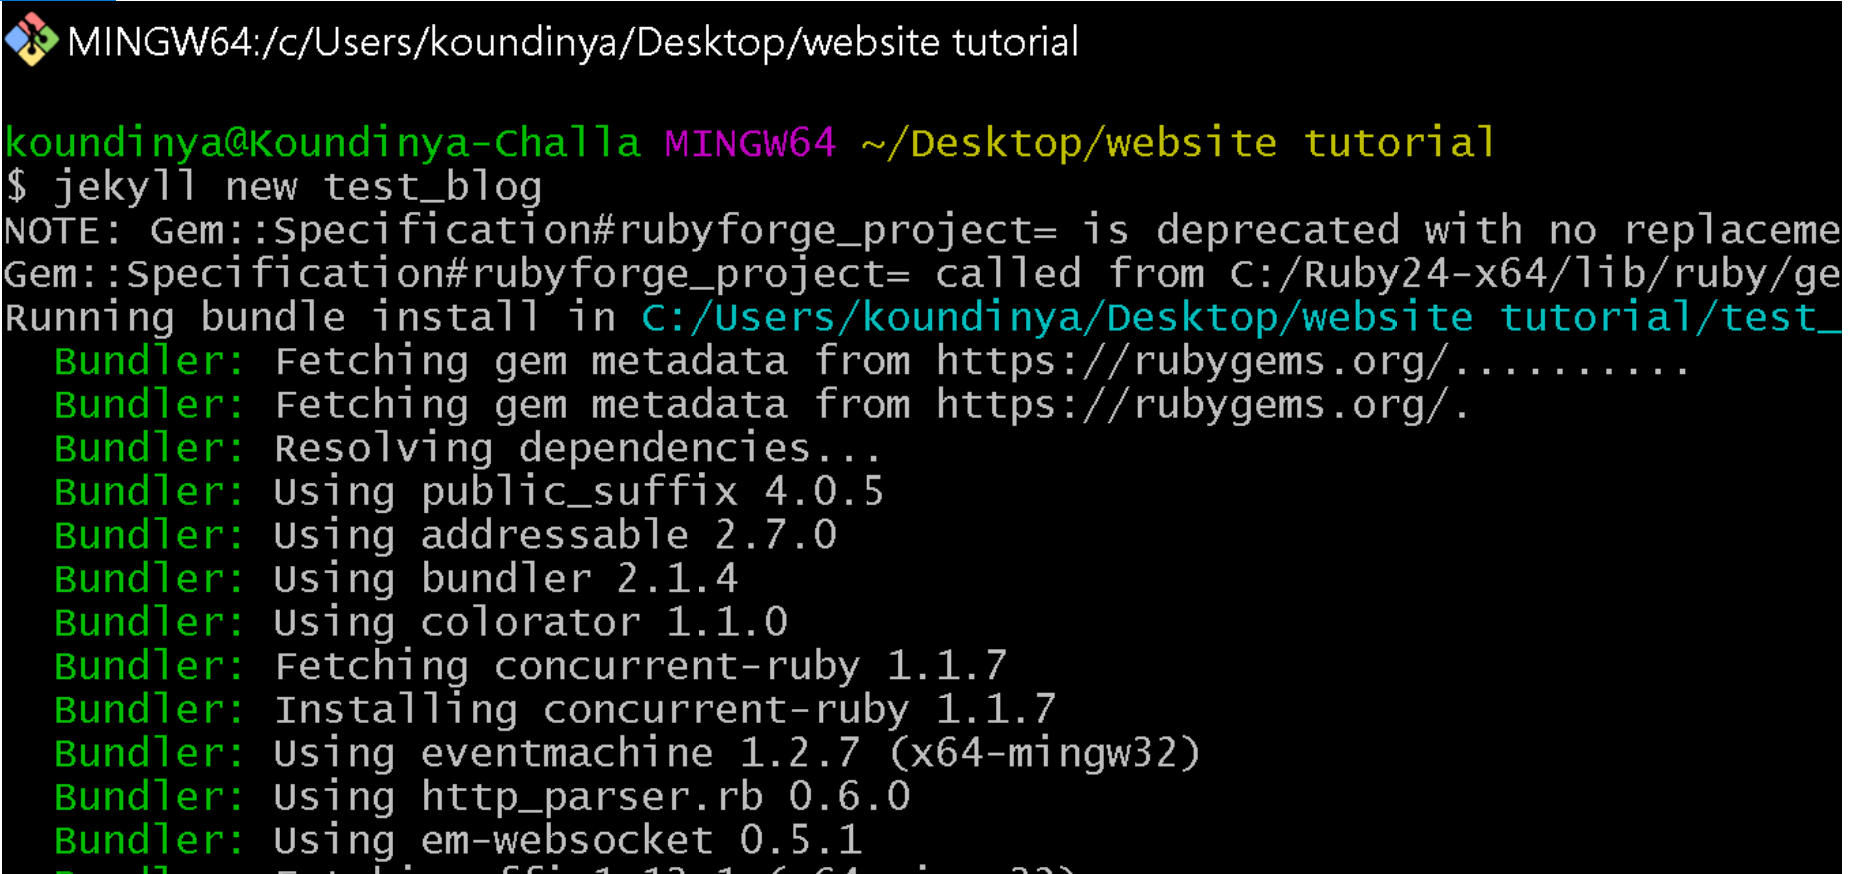
Jekyll creates some default content for the new site.
 Change directory into the
 test_blog directory
cd test_blog
Run the command below at the terminal and Jekyll will take all the pieces of our website and serve them in our browser. Browse the displayed server address http://127.0.0.1:400/ to see the content of the website. You can also stop the display with the command ctrl-c
bundle exec jekyll serve
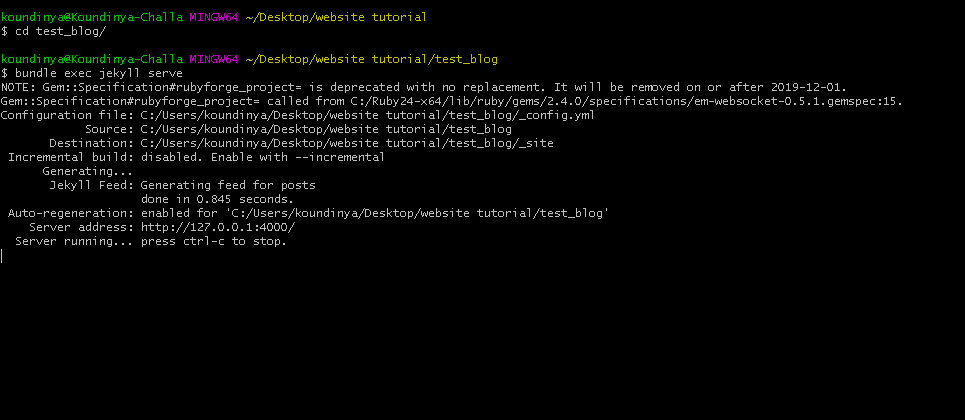
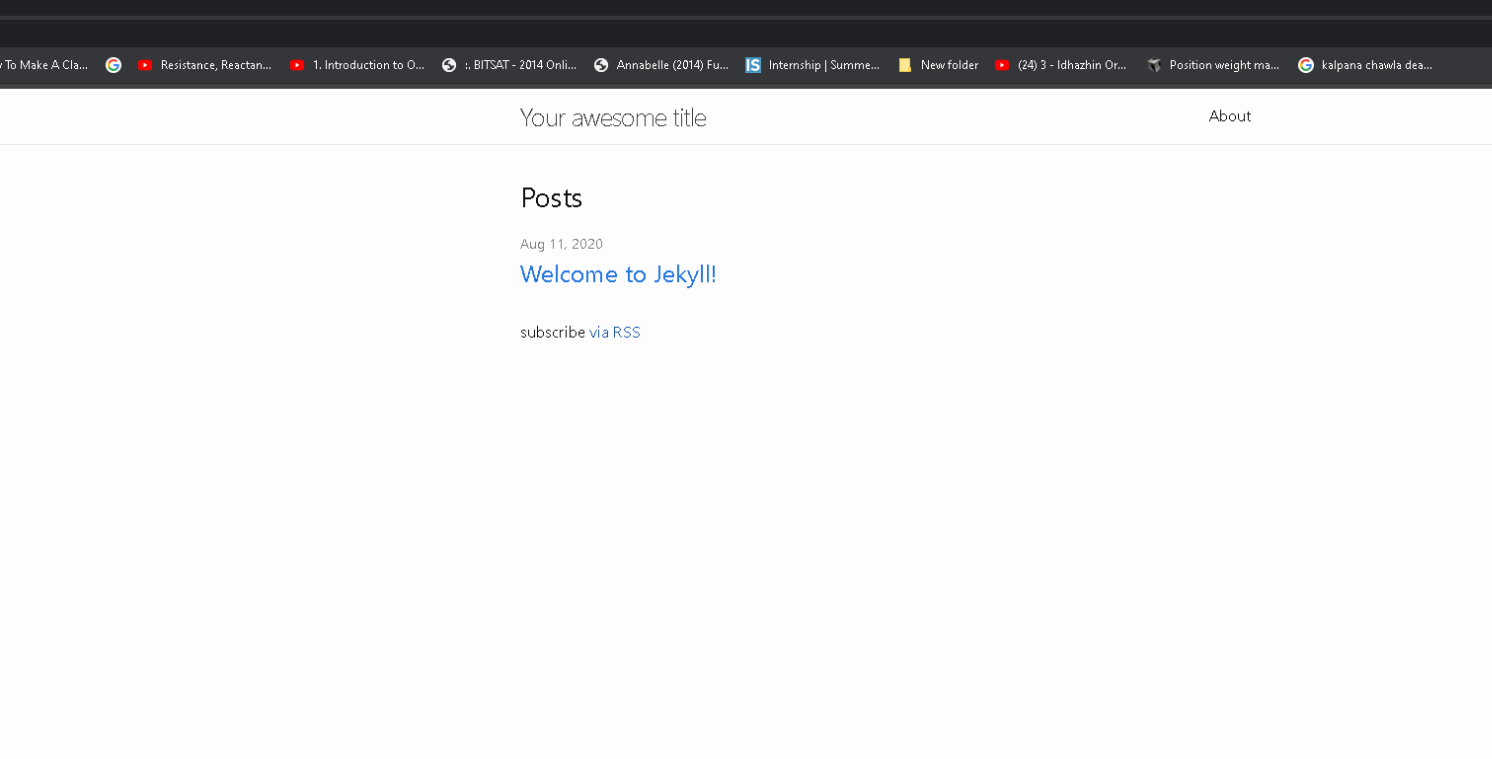
The local host server now displays the new website from the browser.
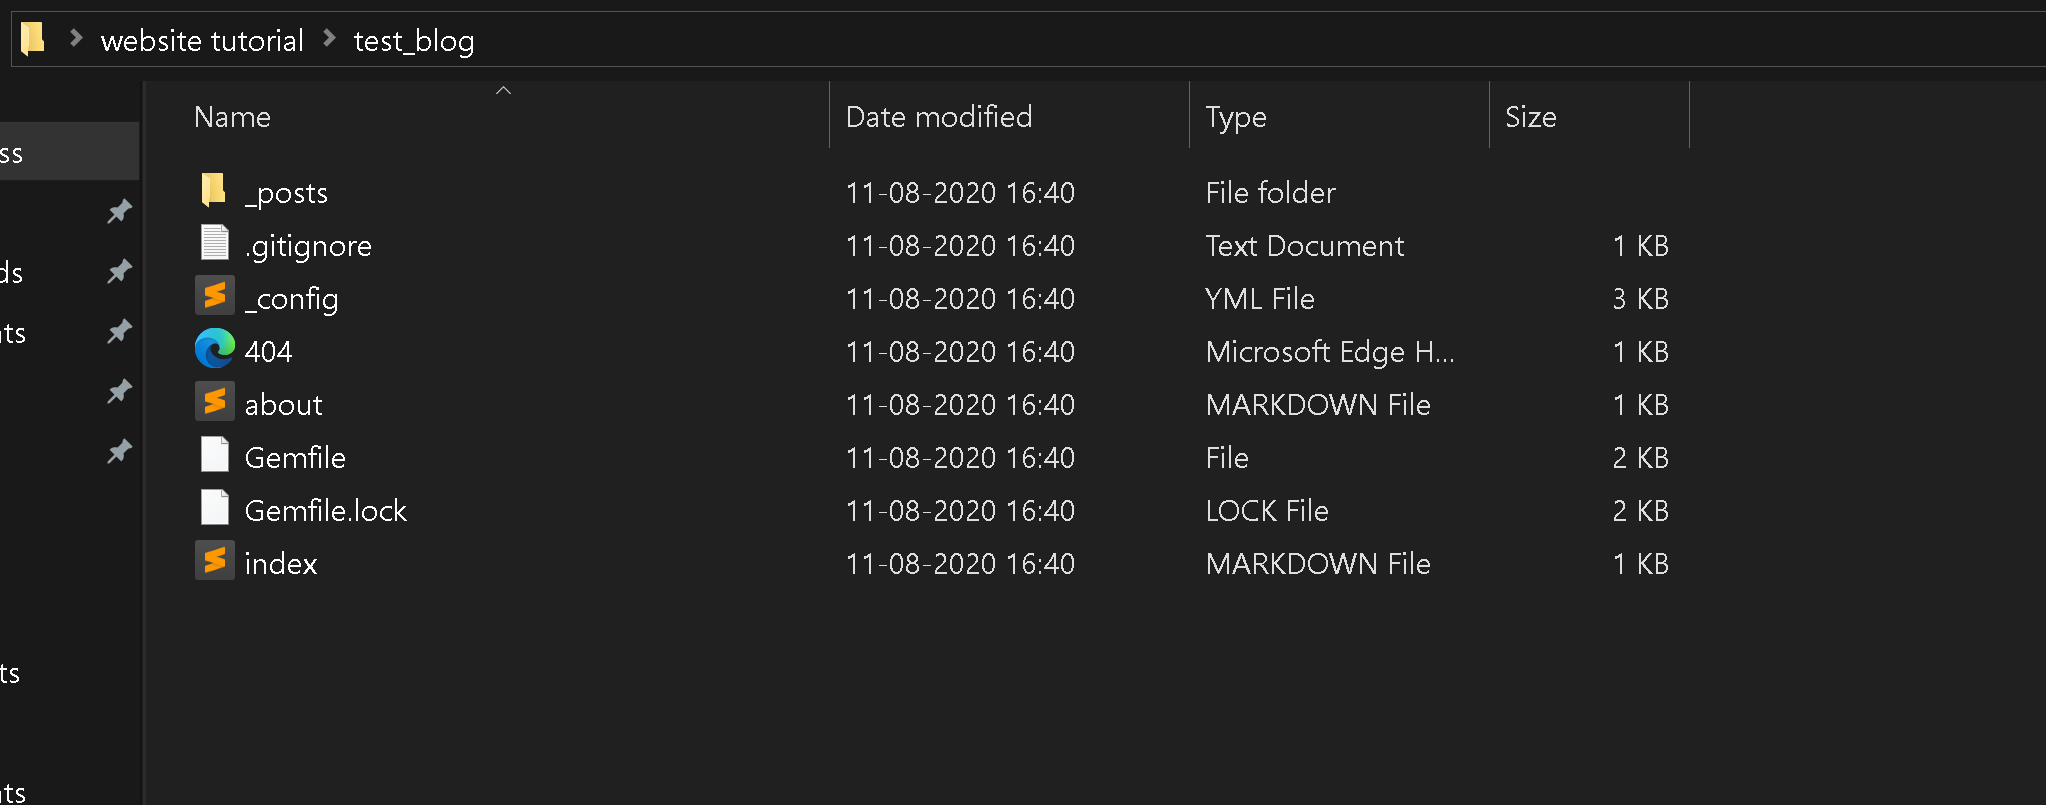
test_blog: the root directory
_posts: folder with all the blog posts.
_site: folder with the final output of the website.
_config.yaml: file with the settings and basic attributes of the site.
Gemfile: holds all the dependencies for the website.
pages: Folder for adding new pages to website.
The rest of the files just default basic parts of our website.
Front matter
Front matter is the site attribute
such as Title and author's name and many others, depending on our preference.
Jekyll reads the front matter first when a file is being executed to check the
layout specifications. See the example below.
---
layout: post
title: Jekyll static site generator
date: 14 August 2020
author: Joe Doe
---
We see some special information at the top of our post which is different from the content, That is called front matter.
config.yaml file has the settings and basic attributes of the site.
Config.yaml
It is the very important file in creating the website as this file has the settings and the attributes related to the site. The format of the config.yaml file looks like this:
title: Your awesome title
author:
  name: GitHub User
  email: your-email@domain.com
description: > # this means to ignore newlines until "show_excerpts:"
  Write an awesome description for your new site here. You can edit this
  line in _config.yml. It will appear in your document head meta (for
  Google search results) and in your feed.xml site description.
show_excerpts: false # set to true to show excerpts on the homepage

# Minima date format
# refer to https://shopify.github.io/liquid/filters/date/ if you want to customize this
minima:
  date_format: "%b %-d, %Y"

  # generate social links in the footer
  social_links:
    twitter: jekyllrb
    github:  jekyll
    # devto: jekyll
    # dribbble: jekyll
    # facebook: jekyll
    # flickr:   jekyll
    # instagram: jekyll
    # linkedin: jekyll
    # pinterest: jekyll
    # youtube: jekyll
    # youtube_channel: UC8CXR0-3I70i1tfPg1PAE1g
    # youtube_channel_name: CloudCannon
    # telegram: jekyll
    # googleplus: +jekyll
    # microdotblog: jekyll
    # keybase: jekyll

    # Mastodon instances
    # mastodon:
    # - username: jekyll
    #   instance: example.com
    # - username: jekyll2
    #   instance: example.com

    # GitLab instances
    # gitlab:
    # - username: jekyll
    #   instance: example.com
    # - username: jekyll2
    #   instance: example.com

# If you want to link only specific pages in your header, uncomment
# this and add the path to the pages in order as they should show up
#header_pages:
# - about.md

# Build settings
theme: minima

plugins:
 - jekyll-feed
 - jekyll-seo-tag
Above is an example config.yaml file of jekyll-minimal theme. As said earlier this has all the basic configurations and settings of the website.
The detailed information of each attribute is as follows:
Title: The title of the page.
Author:
name: THe name of the website author.
email: The email of the author
description: This contains the information about website.
Minima date format: This contains the date format to be used in the website.
social_links: You may add the links to your social accounts here. This generates a hyperlink directly to your mentioned social account.
Build settings: This section have the information related to the theme.
For a detailed information on how to setup the config file, click here
Installing themes
By default, we will be having a minima theme for our Jekyll website. If we want a different theme for our website, there are lots of freely available themes on the internet.
Website for free themes:
You can find many other good websites on the internet.
We will be showing an example of the theme change.
Every theme has a link to the Github repository which shows exactly how to use the theme in the readme.md section.
For the example, we selected a “Jekyll-hacker theme” from the internet. We will read the instructions on how to use it and install it. We will show the difference between the Jekyll minima theme and the new theme.

We can see the theme change.
So basic steps to follow once you select a theme are, In the gem file add your selected theme, then install the theme by the command below.
bundle install
Change the theme attribute in the _config.yaml file and restart the server with the command below.
bundle exec jekyll serve
Do not forget to change the layout names in your posts according to the theme you selected. If you don't change the layout you will not see the changes once you restart the server.
Layouts
Layouts are skeletons of HTML code used to define the looks and feels of different pages or your entire site. By default, Jekyll will provide layouts for our pages. If you want to create your own layout.
- Go to the root directory and create the
_layoutsfolder. - Create an html file of your own and start making your own layout.
In the _layouts folder creating your own layout looks like this.
The code snippet below is an example of a layout called “Home.html” which uses the default layout.
---
layout: default
---

<div class="home">

    <div id="main" class="call-out"
         style="background-image: url('/assets/img/pexels/triangular.jpeg')">
        <h1> <code>Gate City Research Network</code> </h1>
    </div>
</div>
After you create your own layout, you can switch your site layout to it, which will then show up.
Includes
Includes allow us to take certain components of our site such as the header, the footer, or a navigation list and abstract them into their own html files. That means we can have an html file that describes the header or footer for the entire site. We can have a navigation list designed and include that on any page we want on the site. Follow the steps below to create your own layout.
- Go to the root directory and create the
includesfolder. - Create a html file of your own and start to make components of your website.
In the _includes folder creating your own layout looks like this.
The code snippet below is an example of an include html file which creates a navigation list and can be further used anywhere on the site.
<div class="navigation-list">

<li>
<p><a href=""></a></p>
</li>

</div>
The include file can be included in any part of your website.
Creating blog posts
The _posts folder is where your blog posts live. Posts can be written in both Markdown and HTML.
- In the root directory, open the _posts folder.
- Add all the similar blog posts to that particular folder.
- BLog posts should start with a front matter.
You may include pictures/ images in the blog posts. To do that, use

This helps in icluding images in the post.
Assets and how to use them
Using CSS, JS, images and other assets is straightforward with Jekyll. Place them in your site folder and they’ll copy across to the built site. Jekyll sites often use this structure to keep assets organized:
├── assets
│   ├── css
│   ├── images
│   └── js
So, from your assets folder, create folders called css, images and js. Additionally, directly under the root create another folder called ‘_sass’. You could use a standard CSS file for styling, we’re going to take it a step further by using Sass.
CSS file In CSS folder, save the styling files and the bootstrap files.
JS file In this folder, we have all other UI related files.
Assets folder Assets folder can also be used to store images and call these images in the posts. Simply add images in the assets folder and use the image path in the blog posts. here are two ways to call the images in the blog posts.
Use HTML tags
<img src="/assets/images/img.jpg" >
img is a HTML tag to display image. src is the path for the image where the image is located. This path is counted from the root directory. In the above example, assests is the root folder, in assets there is another folder as images and inside images folder the image, img.jpg is stored. However, we can create many folders inside image folder and sort the images respectively. The image path should be used in order to display the images on the webpage.
Use simple syntax

Instead of using html tags, we can use image path to display images on the webpage. Instead of giving html tag, simple use the image path in the parentheses.
For example, Let us see how we have displayed the below image in this page.
.png)
Steps involved:
- Save the image in the Assets folder.
- Copy the path of the image. The path looks like this: “/assets/img.jpg”
- Use the path in the file where the image needs to be displayed by using one of paths above.
Note: When displaying images, always use the correct extension of the image. If the image used is JPEG, use imagename.JPEG. follow same for png and jpg.
OK! But can we display a pdf on the webpage?
The answer is YES! we can display pdf, create a link to open pdf as a new webpage using Jekyll. This can be acheived by using HTML tags.
- Display the pdf in the same webpage.
<embed src="/assets/pdf/1.pdf" width="100%" height="1200px" />
embed: It the HTML tag that allows to display the pdf on the webpage.
src: The path where the pdf is saved. We have saved the pdf in the pdf folder that is in the assets folder. You may save the pdf whereever you want. Simply copy the path and use it in the above code snippet to display the pdf on the webpage.
width: Defining the width of the pdf to be displayed on the webpage.
height: Defining the height of the pdf to be displayed on the webpage.
- Create a link to display the pdf in a seperate webpage.
<a href = "https://gcrnet.github.io/assets/pdf/1.pdf">This is basically creating a hyperlink to display the pdf an a new webpage. In href, use the path as, “page url/pdf path”. In the above code snippet, we want to display the pdf for the same website. Hence we are using “https://gcrnet.github.io” as the page url and “/assets/pdf/1.pdf” as page path.
After all the formating is done and when the website is ready to publish, we use git hub to host the website.
Hosting on Github pages
Github pages (gh-pages) is a service that Github offers and allows you to build and host a static website completely for free. Jekyll integrates with gh-pages very well.
Setting up and hosting a static site in gh-pages:
- Create a Github account.
- Install git on your computer.
- Create a new repository and name that,
test_blog. Do not initialize a readme file.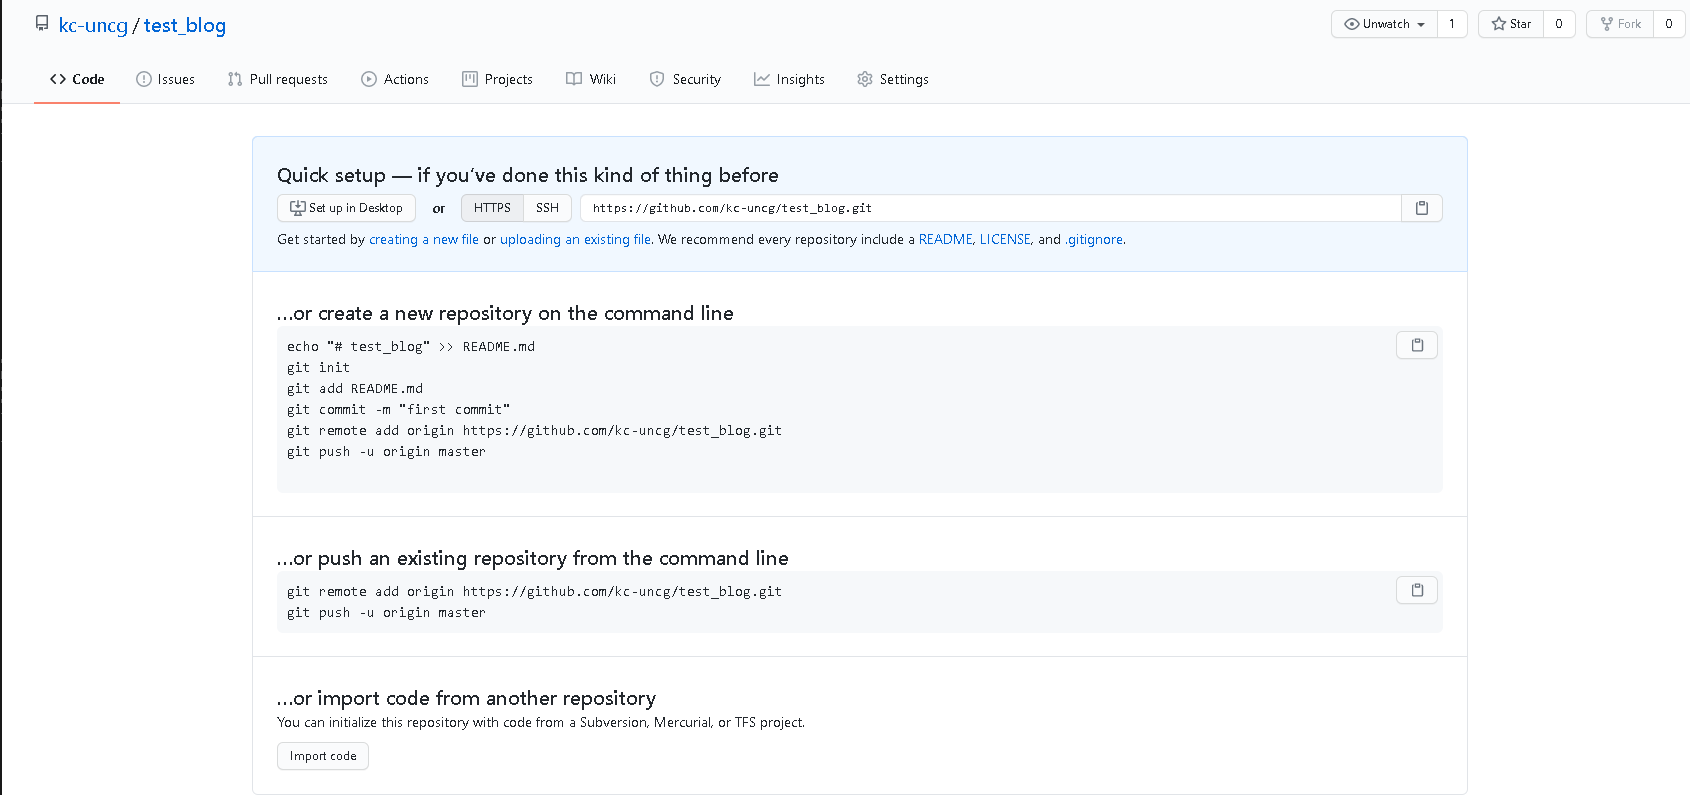
- After creating the repository, we need to edit a variable in the config.yaml file.
- Edit
baseurlattribute. - Add the website name into the base URL, in this case, it is
test_blog. - If you are planning on using a custom domain name you need to put that in the base URL.
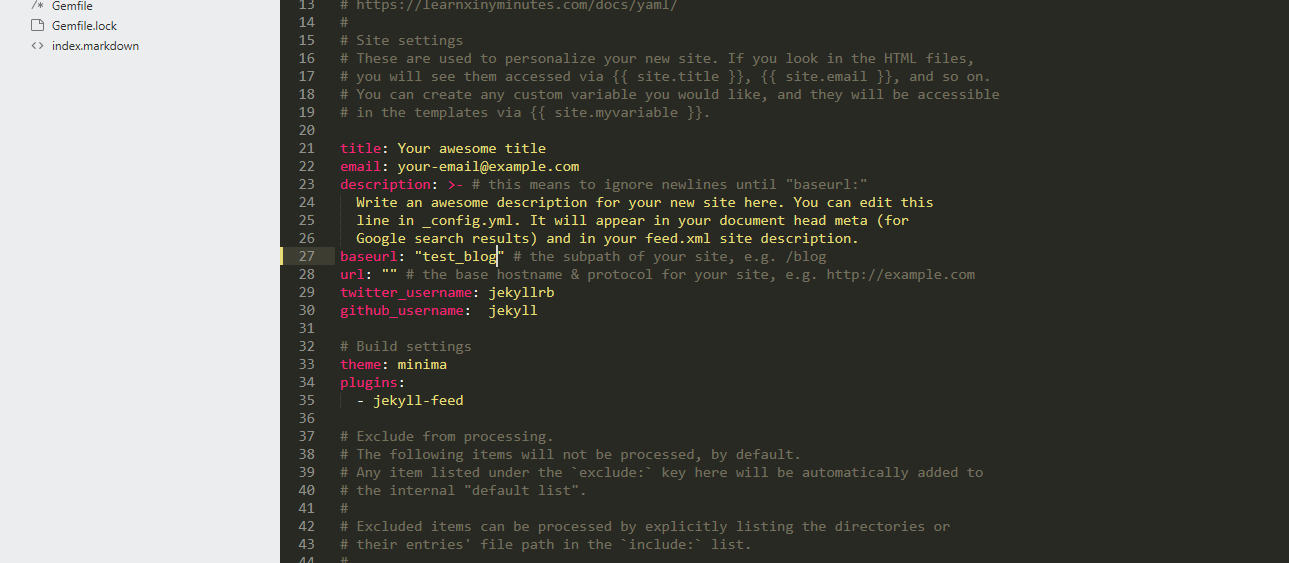
- Edit
- Set up a Github repository inside of the Jekyll project and upload it into Github.
Git commands for creating a repository and uploading all files to Github :
git init
This will initialize an empty repository.git chechout -b gh-pages
We need to store our files on the gh-pages branch of our repository. The above command will checkout the gh-pages branch.git add .
This will add all our files to staging.git commit -m "initial commit"
This is an initial commit.git remote add origin "add your repository address here"git push origin gh-pages
This will upload all the files to the gh-pages.
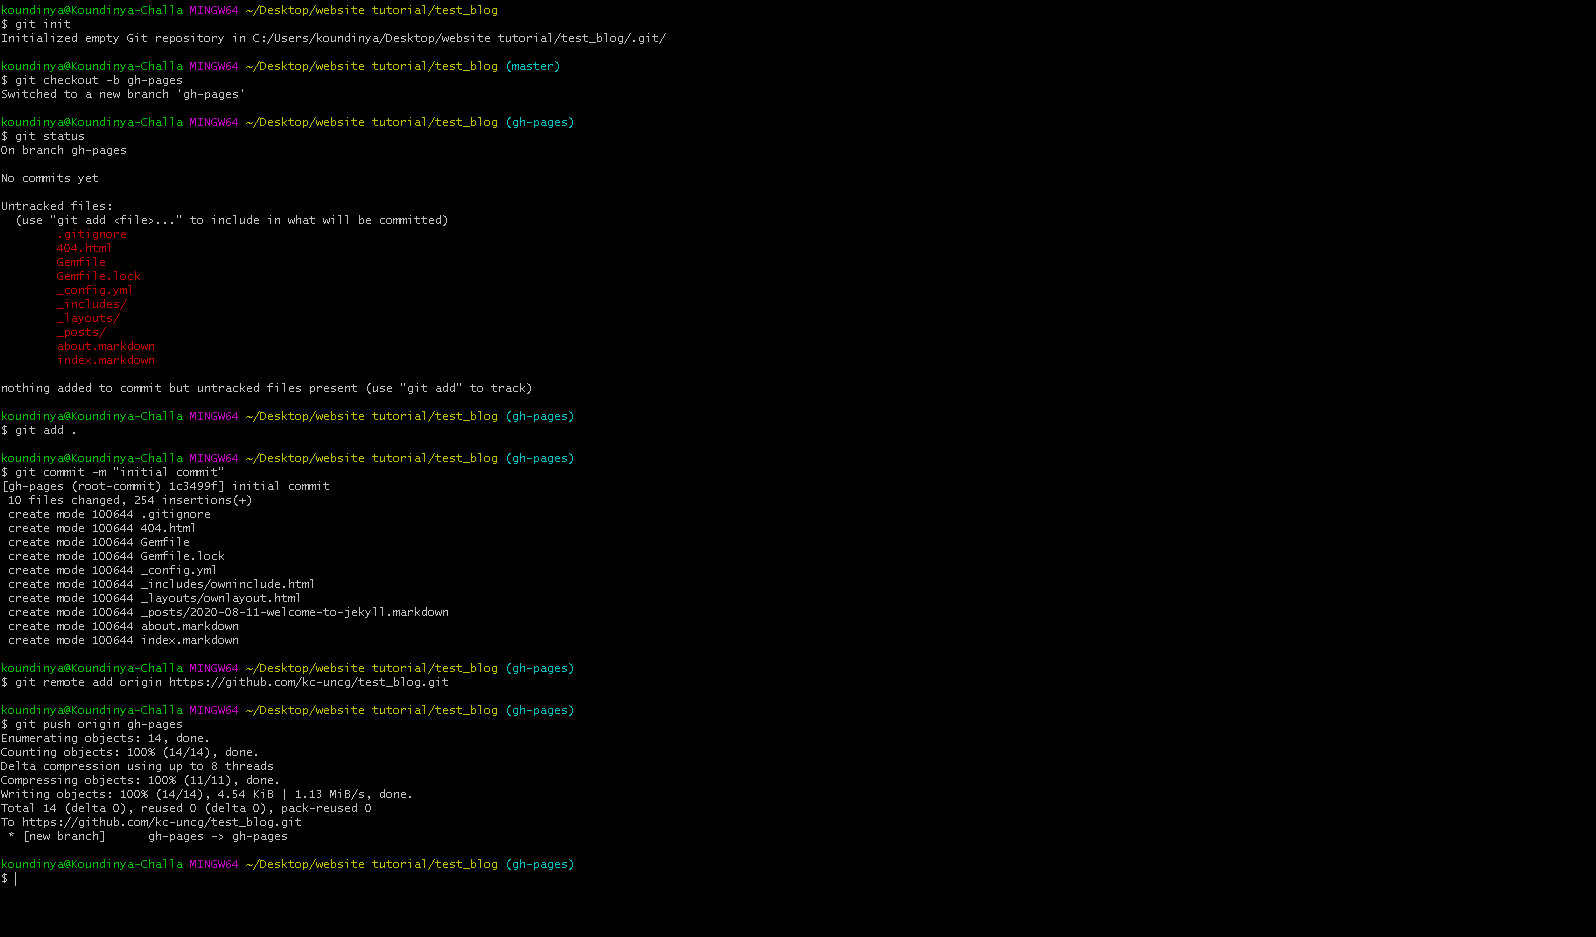
After you upload you will see all the files in Github

You can go to the settings tab and scroll down you will see “your site is published.”
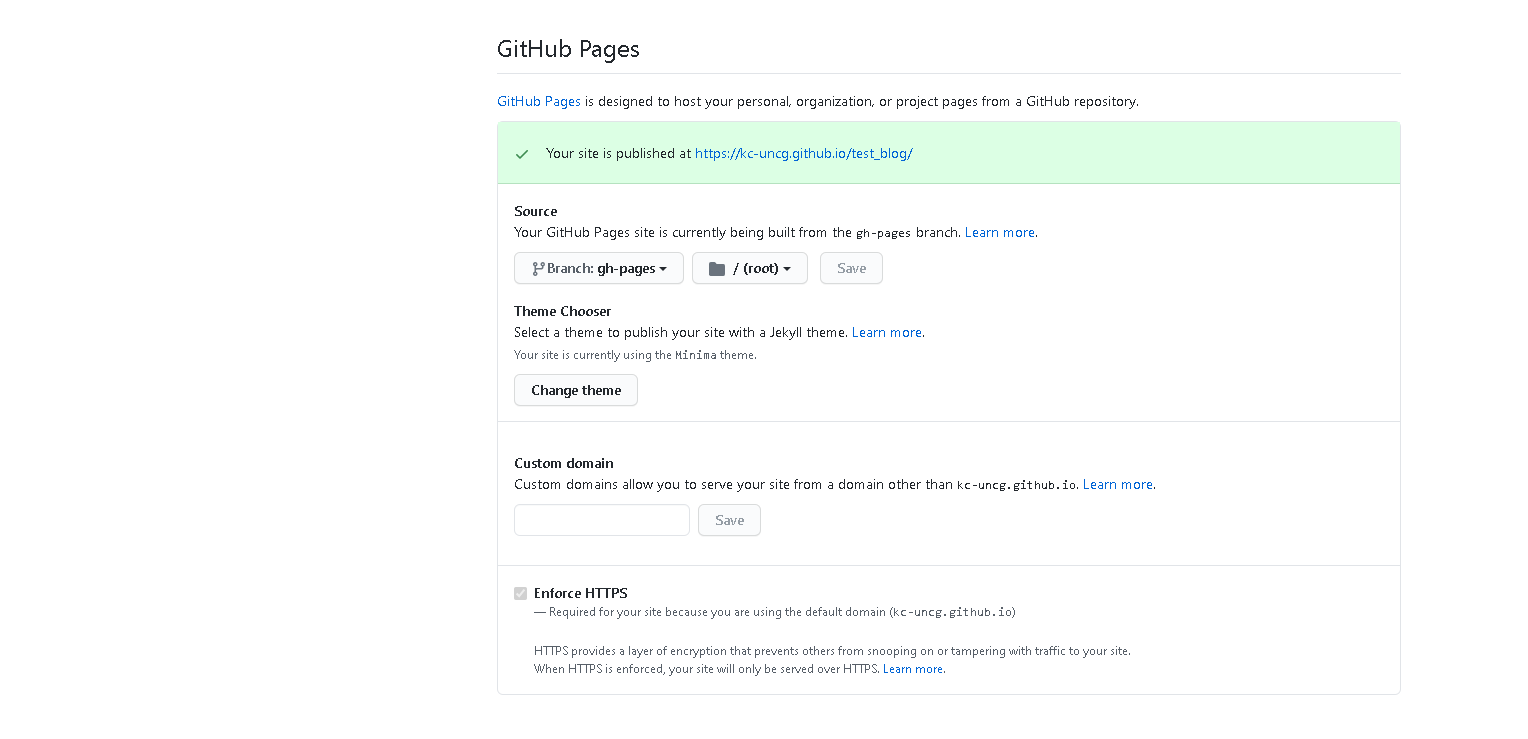
You can use that link to visit your static website.
Wiki
This link will give a more detailed step by step guidance to build the website.
Here is a link to a video tutorial by Giraffe academy. This tutorial is very helpful for more detailed information.